How to Clear the Cache in Your Internet Browser
Speed Up Your Surfing: A Step-by-Step Guide on How to Clear the Cache in Your Internet Browser
Welcome to a smoother browsing experience! If you've ever been curious about the magic behind your lightning-fast web excursions, you've likely encountered the term 'cache'. In the world of web browsers, the cache is a specialized storage location where common data and files you've previously loaded are saved, allowing frequently visited websites to load more quickly on your screen. Think of it as a speedy shortcut for your browser. However, this treasure trove of quick-access data can sometimes get cluttered, causing slowdowns or even display issues with updated web pages. That's where a good cache-clearing session can rejuvenate your browsing experience. Ready to dive in and learn how to clear your cache easily and effectively? Let's clear the digital cobwebs and get your internet browser zipping along at top speed once more!
Why Clearing Your Browser Cache Is Essential
Understanding the importance of clearing the cache in your internet browser is crucial for maintaining optimal performance and safeguarding your privacy. Let's delve into why it's more than just a routine clean-up.
Performance Benefits for Your Browser
One of the major advantages of clearing your cache is the boost in browser performance. Over time, the cache can grow, storing a multitude of files that can bog down browser speed and responsiveness. Clearing the cache helps in reclaiming storage space and can result in faster page load times, as it allows your browser to download fresh content instead of relying on potentially outdated files.
Resolving Page Loading Issues Due to Outdated Cache
Ever encountered a website that looks broken or fails to load new content correctly? This could be because your browser is loading files from the cache that are not up to date with the latest version of the site. Clearing the cache forces your browser to fetch the latest data, ensuring you are viewing the most current version of a website.
Privacy Considerations of Storing Data
Privacy is another significant concern. As you navigate the internet, your browser's cache accumulates bits and pieces of your online activity. This might include sensitive information that you wouldn't want to linger on your device. By clearing your cache regularly, you minimize the risk of someone else accessing your private data should your device be compromised or shared.
Understanding the Basics of Browser Cache
Grasping the basics of cache, cookies, and browsing history is essential for any user looking to maintain their internet browser's performance and privacy. Each plays a unique role in how you experience the web, affecting the speed, functionality, and personal data stored while you browse.
Differences Between Cache, Cookies, and Browsing History
Although they are often mentioned in the same context, cache, cookies, and browsing history serve different functions:
- Cache - This is a collection of web page elements that your browser stores, such as images, scripts, and CSS files. It helps to speed up page loading on subsequent visits by not requiring the browser to download the same items multiple times.
- Cookies - These are small data files placed on your device by websites you visit, which are used for tracking and storing user preferences, login states, and other information that personalizes the user experience on the website.
- Browsing History - This is simply a record of all the websites you've visited, along with timestamps, allowing for easy access to previously visited sites.
What Is Stored in Each and Their Roles in Browsing
Let's take a closer look at what each component stores and how they affect your browsing:
- Cache: Stores temporary copies of web content for quick access. This enables browsers to load pages faster when you revisit them.
- Cookies: Store specific user data to create a more tailored browsing experience, such as staying signed in on your favorite website or preserving shopping cart contents.
- Browsing History: Enables users to return to a previously visited website by clicking through their history. It can be helpful for finding information that you've seen before but didn't bookmark.
Understanding what these elements store and their relevance to your daily browsing is the first step in managing your browser's cache effectively.
How Often Should You Clear Your Cache?
Knowing when to clear your browser's cache is a key aspect of maintaining optimal internet browsing performance and convenience. A cache stores temporary files to make websites load faster upon subsequent visits. However, an overloaded cache may lead to outdated data or minor browsing issues.
Balancing Performance and Convenience
For the everyday internet user, clearing the cache once a month is a good practice to ensure a smooth browsing experience without having to reload everything every time you visit a website. This balance can help you enjoy quicker load times while reducing the chance of encountering outdated information or errors.
Suggestions for Regular Users Versus Developers
If you're a regular user who browses for information, shops online, or streams media, clearing your cache every 4 to 6 weeks should suffice. However, if you're a developer or your work requires you always to have the latest website data, you might want to clear your cache more frequently. Developers may benefit from clearing their cache weekly or even daily, depending on the intensity of their development and testing activities.
Note: Be mindful that clearing your cache will log you out of most websites and may require you to re-enter login details and other personalized settings. Always balance the need for fresh content with the convenience of saved information.
Effortlessly Clear Your Google Chrome Cache: A Simple Guide
If you've noticed your Google Chrome browser is not performing as swiftly as you'd like, it might be time to clear your cache. Don't worry; it's a straightforward process that can drastically improve your browser's speed and performance. Here's your step-by-step guide to getting it done without a hitch.
Accessing the Chrome Menu
To start, locate the three vertical dots in the upper-right corner of your Google Chrome browser. This is the main menu where all the magic begins. Simply click on these dots to open the dropdown menu and prepare to navigate to where your cache lives.
Navigating to the Appropriate Settings Window
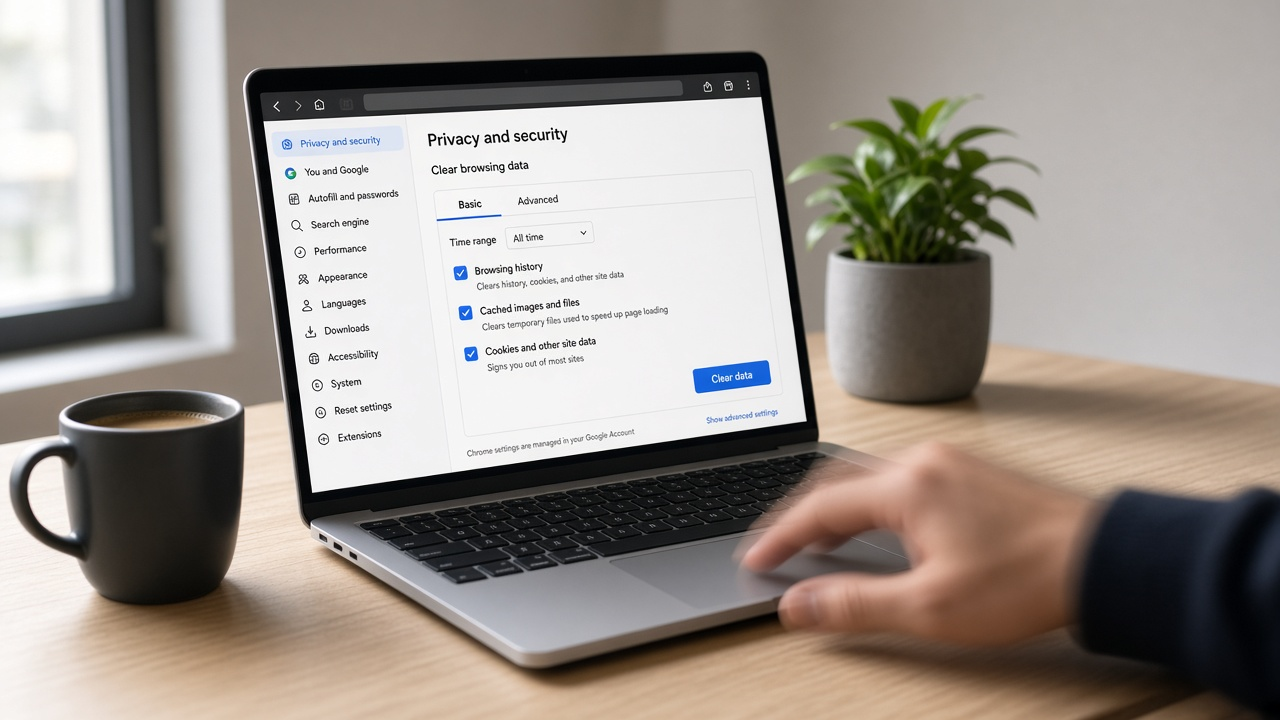
With the dropdown menu open, look for the "Settings" option. Click on it to open a new settings tab in Chrome. Here, you'll find a variety of settings, but the one we're interested in is tucked away under "Privacy and security." Select "Clear browsing data" either by scrolling down or by clicking on "Privacy and security" on the left sidebar.
Detailed Instructions on Data Selection and Clearance Process
Once you're in the "Clear browsing data" window, you'll see a box pop up with several options. To clear your cache, you'll need to:
- Choose a time range at the top. If you want to delete everything, select "All time." This will ensure all cached images and files are removed.
- Tick the checkboxes next to "Cookies and other site data" and "Cached images and files." If you only want to clear the cache and not the cookies, just tick "Cached images and files."
- Review your choices to make sure you're only clearing what you intend to.
- Click on the "Clear data" button and watch as Chrome cleans out your cache, paving the way for a faster browsing experience.
And just like that, you've successfully cleared your Google Chrome cache. By following these simple steps, your browser should now feel smoother and more responsive. Enjoy your clutter-free browsing!
Effortlessly Clear Your Mozilla Firefox Browser Cache
Keep your Firefox browser running smoothly by clearing the cache regularly. In this section, we'll go through the exact steps you need to follow to ensure that your browsing experience is as swift and secure as possible.
Locating the Firefox Menu
To start the cache-clearing process in Mozilla Firefox, you will first need to access the browser menu. Look for the three horizontal lines in the top-right corner of the browser window; this is your gateway to customizing and controlling your Firefox experience.
Step-by-Step Guide Through the Options Page
Once you're in the menu, navigate to the 'Options' page. This section houses all settings related to your browser's performance, including privacy and cache management. Here's the step-by-step breakdown:
- Click on the menu button (three horizontal lines).
- Select 'Options' to open the settings tab.
- Go to the 'Privacy & Security' panel.
- Find the 'Cookies and Site Data' section.
- Click on the 'Clear Data…' button.
After pressing the 'Clear Data…' button, a new window will appear, presenting you with options on what data to clear.
Specifying Firefox Data and Cache Clearance Actions
It's not just about clearing cache; you might want to keep other website data intact. Ensure you only select the options that are necessary for your cache-clearing needs.
- In the 'Clear Data' window, check the box next to 'Cached Web Content'.
- Uncheck any other items that you do not want to delete.
- Click the 'Clear' button to finalize the cache clearance.
By following these instructions, you will have successfully cleared the browser cache in Mozilla Firefox, potentially solving common performance issues and ensuring that your personal data is kept private. Remember to perform this action periodically or as needed to maintain optimal browser function.
How to Clear Cache in Safari
If your Safari browser is slowing down or you're experiencing issues with websites loading improperly, clearing the Safari cache could be a solution. Whether you're on macOS or an iOS device, follow these steps to thoroughly remove website files and data, ensuring a clean slate for your browsing experience.
Steps for Accessing the Menu in Safari
To begin clearing your Safari cache, you need to access the browser's menu:
- On macOS, start by opening Safari and clicking on 'Safari' in the top menu bar. Choose 'Preferences' from the drop-down menu.
- On iOS, go to your device's 'Settings' and scroll down to find 'Safari.'
Instructions Tailored for macOS Users
macOS users should follow these instructions to clear the cache:
- Under the 'Advanced' tab in 'Preferences,' check the box to 'Show Develop menu in menu bar' at the bottom.
- Close the 'Preferences' window and find the new 'Develop' menu in the Safari menu bar.
- Select 'Empty Caches' from the 'Develop' menu.
Note: You can also opt to clear history and website data through 'History' > 'Clear History and Website Data' in the Safari menu bar for a more comprehensive cleanup.
Instructions Tailored for iOS Users
For those using Safari on an iOS device, clear your cache with these steps:
- In the 'Safari' settings, tap 'Clear History and Website Data.'
- Confirm by tapping 'Clear History and Data.' This will not only clear the cache but also your history and cookies.
Ensuring Complete Removal of Website Files and Data
To make sure that all website files and data are removed:
- On macOS, after clearing the cache, you might also want to clear cookies and data by clicking 'Privacy' in the 'Preferences' and then 'Manage Website Data.'
- On iOS, after clearing the cache and history, restart your device by turning it off and back on to ensure all temporary files are removed.
Clearing your Safari cache is an easy and effective way to optimize your browser's performance. Now that you know how to do it on both macOS and iOS, your Safari browsing experience should be quicker and more reliable.
Clearing Cache in Microsoft Edge
Running into performance issues with your Microsoft Edge browser? Clearing the cache regularly can help keep your browsing experience smooth and efficient. Just like tidying up a cluttered room, sometimes your browser needs a quick clean-up. Let’s go through the simple steps to clear the cache in Microsoft Edge.
Using the Edge Menu to Find Cache Settings
To start the cache clearing process, you'll need to access the cache settings within the Microsoft Edge browser. Here's how:
- Click on the three-dot menu icon at the top right corner of your Edge browser.
- Hover over History and then click on Privacy, search, and services on the left panel or directly select History followed by Manage history.
- Next, click on Clear browsing data. Here you can also choose what time range to clear – ranging from the last hour to all time.
Detailed Guide to the Cache Removal Process
Once you’re in the right place within Edge’s settings, you can easily clear the cache following these steps:
- Under Clear browsing data, click on Choose what to clear.
- Select the checkbox next to Cached images and files. You may also select other browsing data types to clear, such as cookies and browser history, depending on your preference.
- Decide on the time range for the cache data you want to delete. If you want to completely refresh your browser, consider selecting All time.
- Once you’ve made your selections, click on the Clear now button.
And that's it! You’ve successfully cleared the cache in Microsoft Edge, potentially speeding up your browsing and resolving any loading or formatting problems with websites you visit.
Clearing Cache in Opera: Boost Your Browser's Performance
Are you experiencing slow load times or outdated content while browsing with Opera? Clearing your browser cache might just be the solution you need. The process is straightforward and can greatly improve your browsing experience. Here’s a simple guide to help you refresh your Opera browser by clearing the cache efficiently.
Directions to Menu and Settings in Opera
To begin clearing your cache in Opera, you'll first need to navigate to the browser's menu and settings. These straightforward steps will take you right where you need to be:
- Open your Opera browser.
- Click on the 'Opera' logo located in the upper-left corner of the window.
- Select 'Settings' from the drop-down menu. You can also press Alt+P on your keyboard as a shortcut to directly open the Settings page.
- Within settings, click on 'Privacy & Security' located on the sidebar to access the section that allows cache management.
Step-by-Step Cache Clearing for Improved Browser Performance
Now that you're in the right place, you can proceed with clearing your browser's cache. Just follow these easy steps:
- Under the 'Privacy & Security' section, locate the 'Clear browsing data' option.
- Click the 'Choose what to clear' button.
- From the dropdown menu, make sure to select 'Cached images and files.'
- You can also select the time range for which you want to clear the cache. If you wish to entirely refresh your browser, 'the beginning of time' is a recommended option.
- After you've made your selections, click on the ‘Clear data’ button.
Note: Clearing your cache will sign you out of most websites, so be prepared to log in again to any sites you were previously signed into.
By following these steps, you should have successfully cleared your cache in Opera, paving the way for a faster, more efficient browsing experience. Remember, keeping your browser's cache cleared periodically can prevent numerous performance issues and contribute to safeguarding your online privacy.
Easy Steps to Clear Cache on Mobile Browsers
Cleaning your mobile browser's cache can free up space, protect your privacy, and improve your device's performance. As with desktop browsers, mobile browsers also accumulate cache files. The process to clear these files can vary slightly between Android and iOS devices, as well as across different browsers. Let's walk through the simple steps for both platforms.
Clearing Cache on Android Browsers
Most Android browsers can be cleansed of their cache through a similar process, with minor variations depending on the browser you're using:
- Open your browser app.
- Tap on the menu icon (three dots or lines usually located in the corner of the screen).
- Select 'Settings' or 'History'.
- Look for an option that says 'Clear browsing data' or 'Privacy.'
- Ensure 'Cached images and files' is selected.
- Tap on 'Clear data' or 'Clear cache.'
Note: On some browsers, you might have to dive into 'Advanced' settings to find the cache clearing options.
Clearing Cache on iOS Browsers
For iPhone and iPad users, the process is just as straightforward. The following instructions are for Safari, the default iOS browser:
- Open the 'Settings' app on your iOS device.
- Scroll down and select 'Safari.'
- Tap on 'Clear History and Website Data.'
- Confirm the action by tapping 'Clear History and Data.'
Tip: For third-party browsers like Chrome or Firefox on iOS, the process will generally mimic the Android instructions but will be adjusted to fit the iOS interface.
Differences Between Mobile and Desktop Cache Clearing
Mobile browsers generally have a more simplified menu system than their desktop counterparts. The options are often fewer and more straightforward, allowing for a quicker clearing process. However, mobile devices may require you to clear cache from the device's settings app for a more thorough cleanup, especially if you're looking to clear cache for apps that are not browser-specific.
Knowing how to clear cache on your mobile browser is essential for maintaining an optimal browsing experience. By following these simple steps, you can ensure that your mobile browsing is as quick and secure as regular maintenance on your desktop browsers.
Potential Issues and Troubleshooting Cache Clearing
Even with detailed instructions, you might encounter hiccups while clearing your browser's cache. It's perfectly normal, and most issues can be resolved with a bit of troubleshooting. Let's explore some common problems and solutions to ensure your cache clearing efforts are successful.
Addressing Common Problems That May Arise
If you've followed the steps to clear your cache but it doesn't seem to have an effect, there might be a few things to check:
- Browser Not Restarting: Some changes won’t take effect until you restart your browser. Make sure to close it entirely and reopen it after clearing the cache.
- Multiple Tabs/Sessions: If you have multiple browser sessions or tabs open, make sure all of them are closed before restarting.
- Sync Issues: If you’re using a browser that syncs data across devices, the cache might be repopulating from another device. Consider clearing the cache from all devices or temporarily disable syncing.
How to Troubleshoot and Ensure Complete Cache Removal
Sometimes, clearing the cache requires a bit more digging. If you're still experiencing issues, here are some troubleshooting tips:
- Check for Updates: An outdated browser may not clear the cache properly. Ensure you have the latest version installed.
- Use Incognito Mode: Open an incognito or private browsing window. If the issue isn't present there, the cache likely has been cleared, and you might be dealing with saved cookies or another form of local storage.
- Clear Cookies: Sometimes, you have to clear both the cache and cookies to solve certain issues. Look for the option to remove cookies in your browser settings.
- Advanced Settings: Look in the advanced settings or developer tools in your browser for additional options to clear cached data or to flush the socket pools.
- Third-Party Software: If manual clearing doesn't work, consider using third-party software designed to clean up browser data. Be cautious and use only trustworthy applications.
- Restart Your Device: As a last resort, try restarting your computer or mobile device; this can clear caches held in memory.
Encountering issues while clearing your cache is common, but with these troubleshooting steps, you should be able to address most problems effectively. Remember, maintaining browser performance sometimes requires a bit more than just routine cache clearing.
Privacy Considerations When Clearing Cache
Clearing your browser's cache is not just about freeing up space or ensuring that websites load correctly. It's also a crucial step in managing your online privacy and data security. Every time you visit a website, pieces of data are stored in your cache that could potentially reveal your browsing habits and personal information to prying eyes. Therefore, understanding what happens to your data when you clear your cache is essential.
Assessing the Implications for Online Privacy and Data Security
When you clear your cache, you essentially erase the footprint of pages you have previously visited. This makes it more difficult for advertisers and other third parties to track your online activities. However, it's important to realize that this does not make you anonymous on the internet. While clearing the cache can protect the privacy of your past browsing history, it doesn’t prevent online entities from tracking your future activities.
Deciding What Information Should be Cleared and What Should be Preserved
As you go about clearing your cache, you might want to consider what information serves your convenience and what poses a risk to your privacy. For instance:
- Cookies: While they are useful for keeping you logged in on websites, they can also be used to track your browsing activities.
- Cached Images and Files: These can speed up the loading time of frequently visited websites but can also be a snapshot of your browsing history.
- Autofill Information: This can save you time when filling out forms but could also be a security risk if sensitive information is stored.
Carefully decide whether convenience outweighs privacy in each case or if it’s better to start afresh with a clean slate.
Benefits of Clearing Cache for Browser Performance
Are you noticing your internet browser is not as quick and responsive as it once was? Clearing your browser's cache can often rejuvenate its performance, leading to a smoother and more reliable browsing experience. Let's explore the primary benefits of regularly clearing your cache:
Improved Speed and Reliability
Accumulated cache can weigh down your browser, causing slow load times and occasional crashes. Clearing the cache removes these redundant files, freeing up memory and allowing the browser to operate more efficiently. It's akin to decluttering your workspace; it leads to better focus and productivity for your Internet browser.
Refreshing Website Content
Web developers frequently update their sites, but if your cache holds onto old data, you may not see the latest version. Clearing your cache forces the browser to retrieve the newest content. This means you're always interacting with the most up-to-date and secure version of a website.
Resolving Loading Errors
Ever encountered a web page that just wouldn't load correctly, or experienced persistent formatting issues? These are often cache-related errors. By clearing your cache, you can resolve these loading errors as the browser will be prompted to download fresh files, often fixing the issue outright.
- Faster Page Load Times: With less data to process, your browser can render pages faster.
- Up-to-date Interaction: Get the most current user experience from websites that update their interface and content frequently.
- Fewer Errors and Glitches: Reduce the chances of running into broken pages or outdated forms that could hinder your online activities.
Automating Cache Clearing
Regularly clearing your browser's cache can be a repetitive task, but did you know you can automate it? Various tools and settings now exist to manage your cache without the need to remember to clear it manually. Automation can be a time-saver and an excellent way to ensure that your browser functions optimally.
Tools and Settings for Automatic Cache Management
Most modern browsers come equipped with features that allow you to automatically clear the cache each time you exit the application. For example, in Google Chrome you can navigate to the settings menu, click on 'Advanced', and from there you can adjust the 'Privacy and security' options to clear your cache and browsing history automatically upon closing the browser. Additionally, third-party software and extensions are available that can provide even more control over when and how your cache is cleared.
Pros and Cons of Using Automation for Cache Clearing
Automating the process of cache clearing offers several advantages:
- Convenience: Set it once, and forget about it. You no longer need to remember to manually clear your cache.
- Efficiency: It ensures your browser is always running with a clean slate, potentially speeding up your browsing experience.
- Privacy: Regularly clearing your cache can help protect your personal data by removing stored information automatically.
However, there are some downsides to consider as well:
- Potential Data Loss: You might lose some saved data like passwords and autofill form entries if not correctly configured.
- Inconvenience: Sometimes, clearing cache automatically can log you out of frequently visited sites, requiring you to log in again.
- Overzealous Cleaning: If you access certain sites regularly, having a clean cache every time might slow down your access to these sites as the cached data needs to be reloaded.
Automating cache clearing strikes a balance between ease of use and maintaining streamlined browser performance. By carefully configuring the settings and considering how often you require different types of data, you can make automation work effectively for you.
Conclusion: Keeping Your Browser Cache in Top Shape
As we've navigated through the various methods of clearing your cache in different internet browsers, one truth remains clear: proper cache management is critical for a seamless browsing experience. Whether you're a casual surfer or a seasoned digital professional, taking the time to review and clear your browser cache can have considerable benefits.
Through this guide, we've highlighted the role of cached data in speeding up page loading and how it impacts your interaction with websites. Now that you're equipped with the know-how to clear the cache across a range of browsers—from Google Chrome to Safari, and from desktop to mobile—it's important to set a routine for maintaining your browser's cache.
Best Practices for Managing Browser Cache
Let's not forget to always clear “Cookies” alongside cache data, as this helps in addressing privacy concerns and ensuring that your browser is not storing unnecessary personal data.
Final Thoughts
Whether you're thumbing through menus in Firefox or tapping through windows on your mobile device, remember that your browser’s cache, albeit a powerful tool for efficiency, should be tended to with diligence. Treat the process of clearing cache as a routine check-up for your browser; just like any well-oiled machine, regular maintenance is key to optimal performance.
With the steps and tips provided, you’re well on your way to mastering the ins and outs of browser cache management. Keep revisiting these guidelines, and embrace a proactive stance in managing your web browsing experience.